
Artiko.ai – Chat Widget Configurator: Step-by-Step Guide
Welcome to the Artiko.ai Chat Widget Configurator! Below, you’ll find a detailed overview of each step you see in the image. By following these instructions, you can quickly set up, customize, and manage your own live chat widget and its automated assistant.
1. Select Your Assistant
The first step is choosing which AI or bot configuration will power your chat. If you have multiple assistants available in your Artiko.ai account, pick one from the dropdown labeled “Default Chatbot” (or whichever name you’ve assigned). This determines how your widget replies to users, including its AI “personality” and knowledge base.
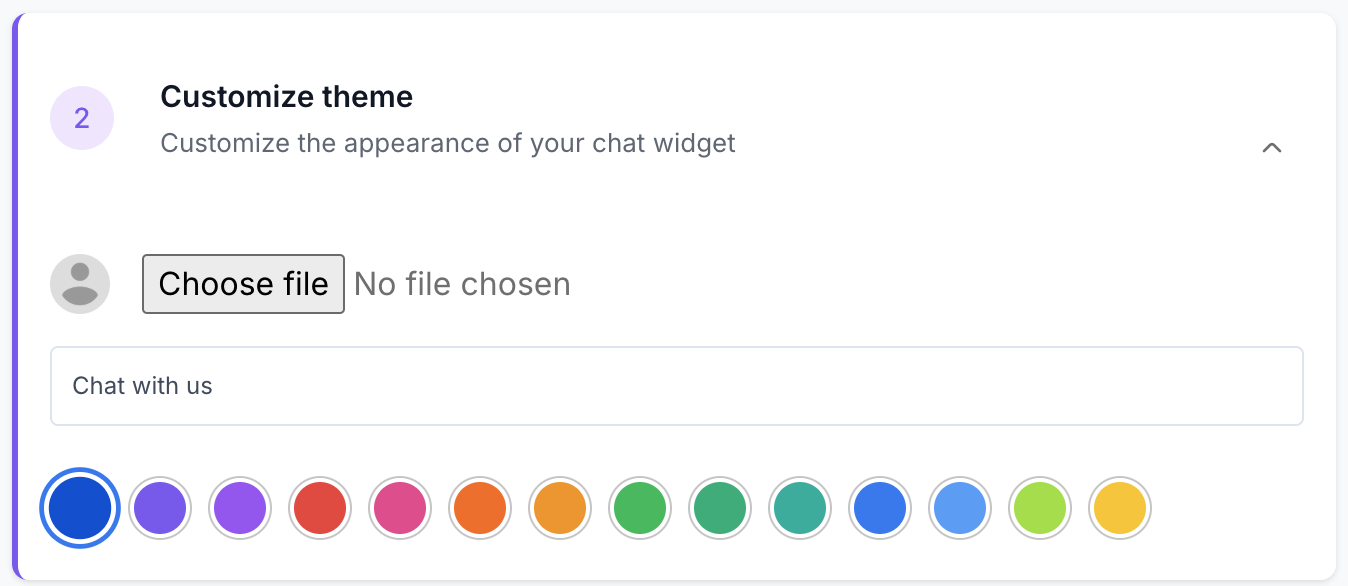
2. Customize Theme
In this section, you can personalize the look and feel of your chat widget to match your brand or website design. Here are the main options you’ll see:
- Upload an Avatar or Logo: Use the “Choose file” button to upload a custom image that will appear in your chat widget, often used for a company logo or a bot avatar.
- Widget Header Text: A text field (defaulted to “Chat with us”) where you can set the header or title that appears at the top of the chat window.
- Color Selection: Choose from a range of preset colors for the widget’s header, buttons, or accent elements. Just click on a color circle to instantly preview it in your widget.
By making these adjustments, you can ensure the chat widget stays consistent with your brand identity and creates a welcoming experience for users.
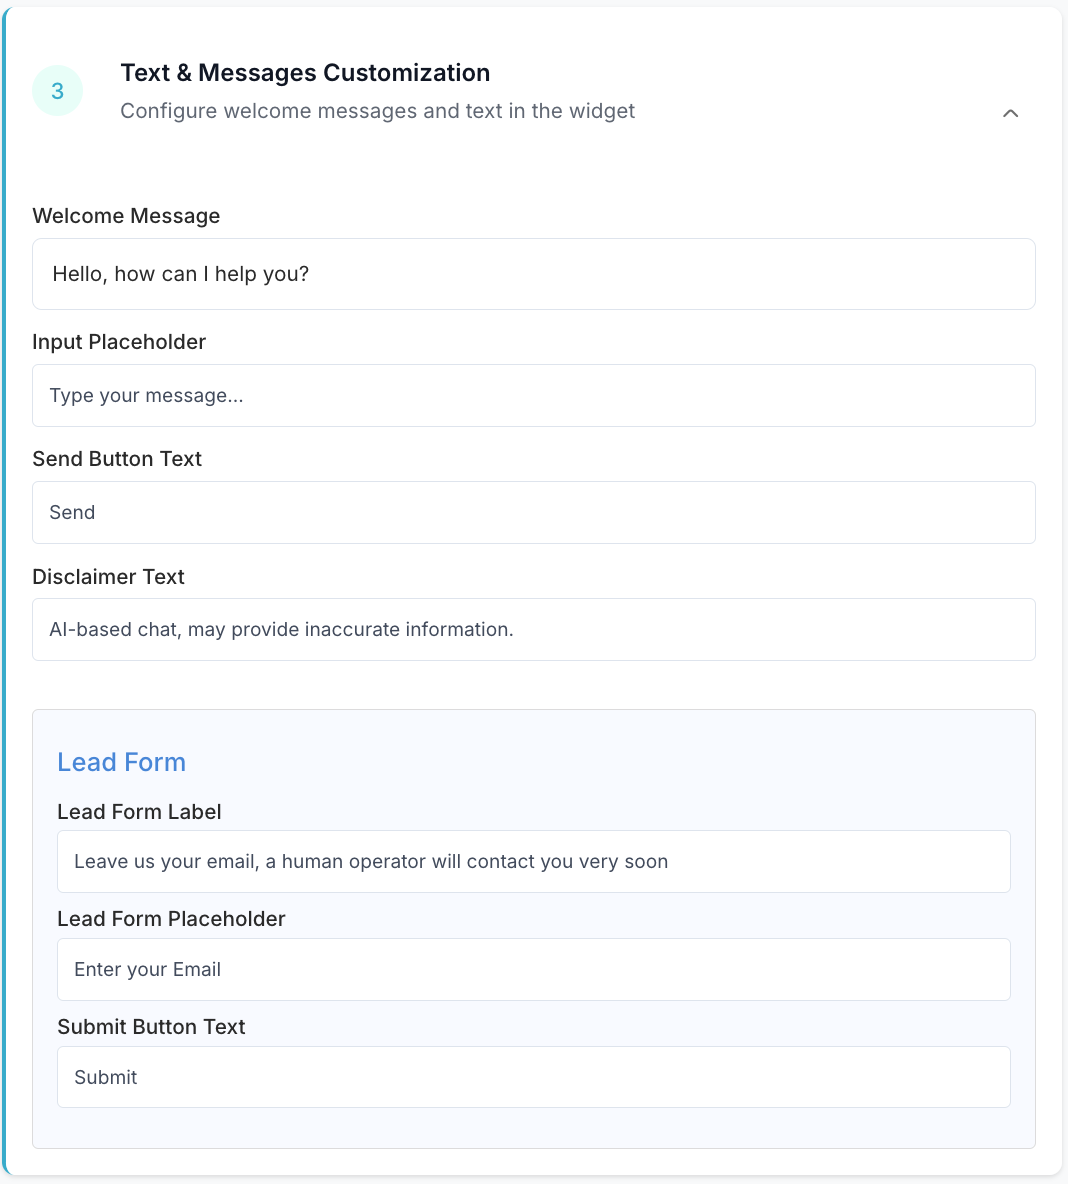
3. Text & Messages Customization
In this section, you can fine-tune all the text elements displayed within your chat widget, ensuring the tone and instructions match your brand style. Below are the key fields you’ll see:
- Welcome Message: The greeting a user first sees upon opening the chat. For example, “Hello, how can I help you?”
- Input Placeholder: The placeholder text shown in the message input field (e.g., “Type your message…”).
- Send Button Text: Typically “Send” by default, but you can change it to suit your preference.
- Disclaimer Text: A small note about the chatbot’s nature, such as “AI-based chat, may provide inaccurate information.”
Additionally, the Lead Form area lets you capture user details if you’d like to follow up later:
- Lead Form Label: Text above the email or contact field. For instance, “Leave us your email, a human operator will contact you very soon.”
- Lead Form Placeholder: Placeholder for the input field (e.g., “Enter your Email”).
- Submit Button Text: Label for the button that submits this form, such as “Submit” or “Send Info.”
By adjusting these fields, you can make your chatbot conversations and lead capture process more inviting, effective, and aligned with your communication style.
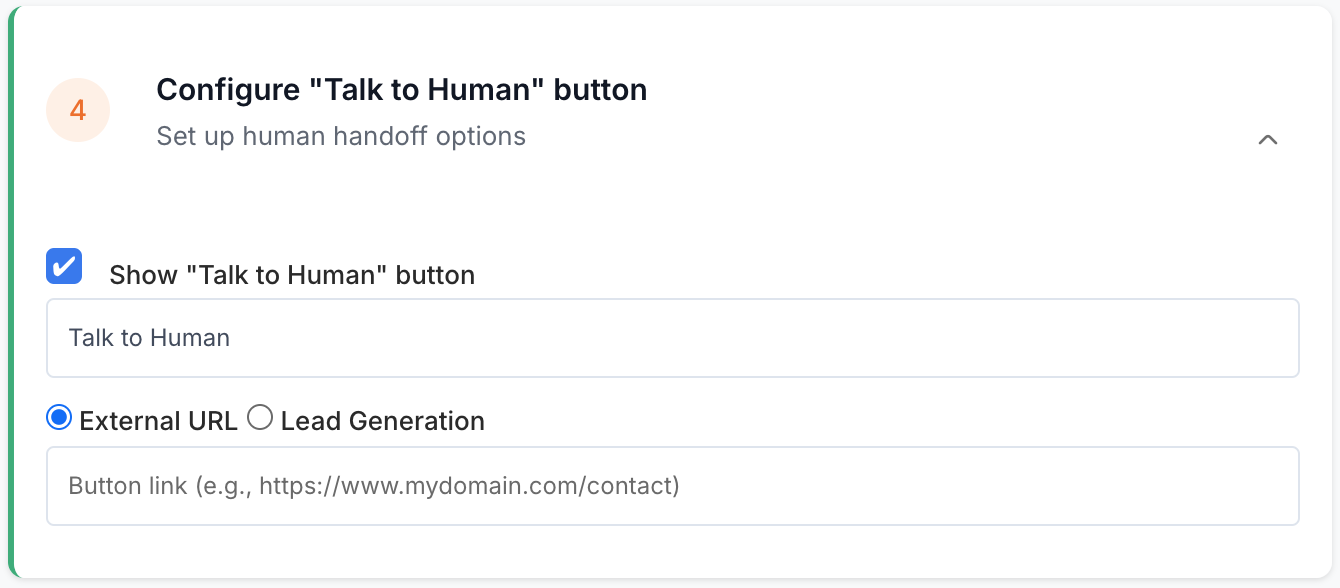
4. Configure “Talk to Human” Button
This step allows you to give users the option to switch from AI-driven responses to communicating with a real person. By enabling the “Talk to Human” button, you can either:
- Redirect them to an External URL (e.g., a contact page or booking form), or
- Initiate a Lead Generation flow, letting them enter their email address or other details right in the chat.
Show “Talk to Human” Button
Check this box to make the button visible to your site visitors. Enter the text you want to appear on the button (e.g., “Talk to Human,” “Contact Support,” etc.).
External URL
If you select “External URL,” the button will link to any webpage you specify. Some common examples:
- Contact Page: “https://www.mydomain.com/contact”
- Booking Form: “https://www.mydomain.com/book-now”
- Appointment Scheduler: A dedicated scheduling service link
Once the user clicks the button, they’ll be redirected to that URL, where they can continue the conversation or fill out a form for further assistance.
Lead Generation
If you choose “Lead Generation,” your visitors can provide their email address (or other contact details) directly within the chat widget. For example:
- Email: They type in something like “info@artiko.ai” or their personal email.
This approach keeps the user within the chat environment and helps you capture leads without sending them elsewhere. Once submitted, the contact info is sent to your designated channel or email, allowing a human operator to follow up.
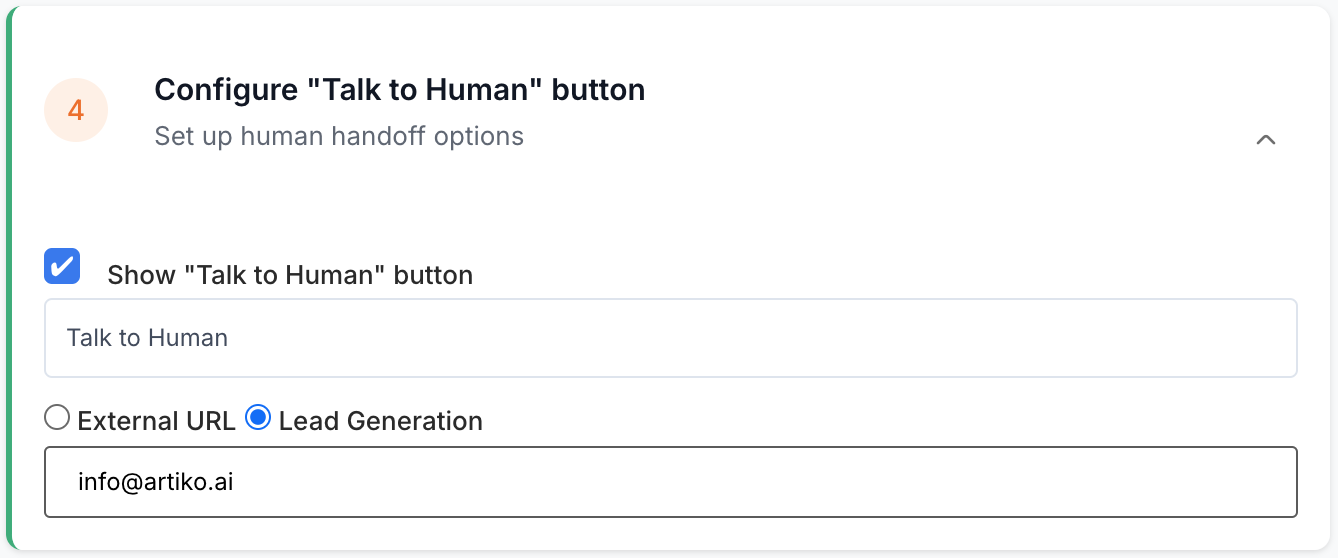
By configuring the “Talk to Human” button to either direct visitors to an external page or gather leads on the spot, you give your audience an effortless way to escalate their queries. This enhances user satisfaction and streamlines your support workflow.
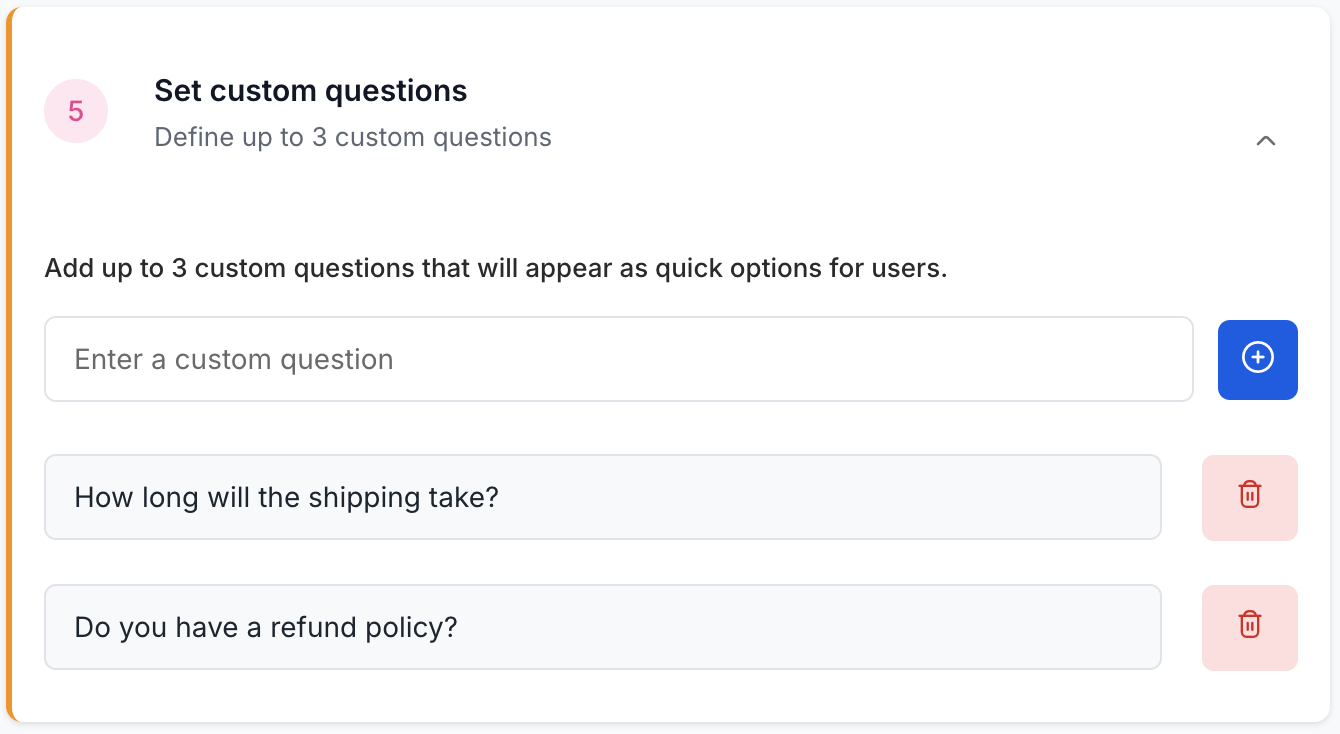
5. Set Custom Questions
This section allows you to define up to three “quick questions” that users can tap or click on to immediately ask. It’s an easy way to guide visitors toward common topics or FAQs. Each question will appear as a simple button or prompt within the chat window.
For example, you might enter:
- “How long will the shipping take?”
- “Do you have a refund policy?”
- “Where do you deliver?”
When a user clicks one of these custom questions, it’s automatically posted in the chat, and the chatbot (or your assigned assistant) will respond right away. This can significantly speed up conversations by anticipating visitors’ most common queries.
To add or remove a question:
- Add a new question: Type it in the “Enter a custom question” field and click the plus (+) button to save.
- Delete an existing question: Click the trash icon (appearing in red) next to the respective question.
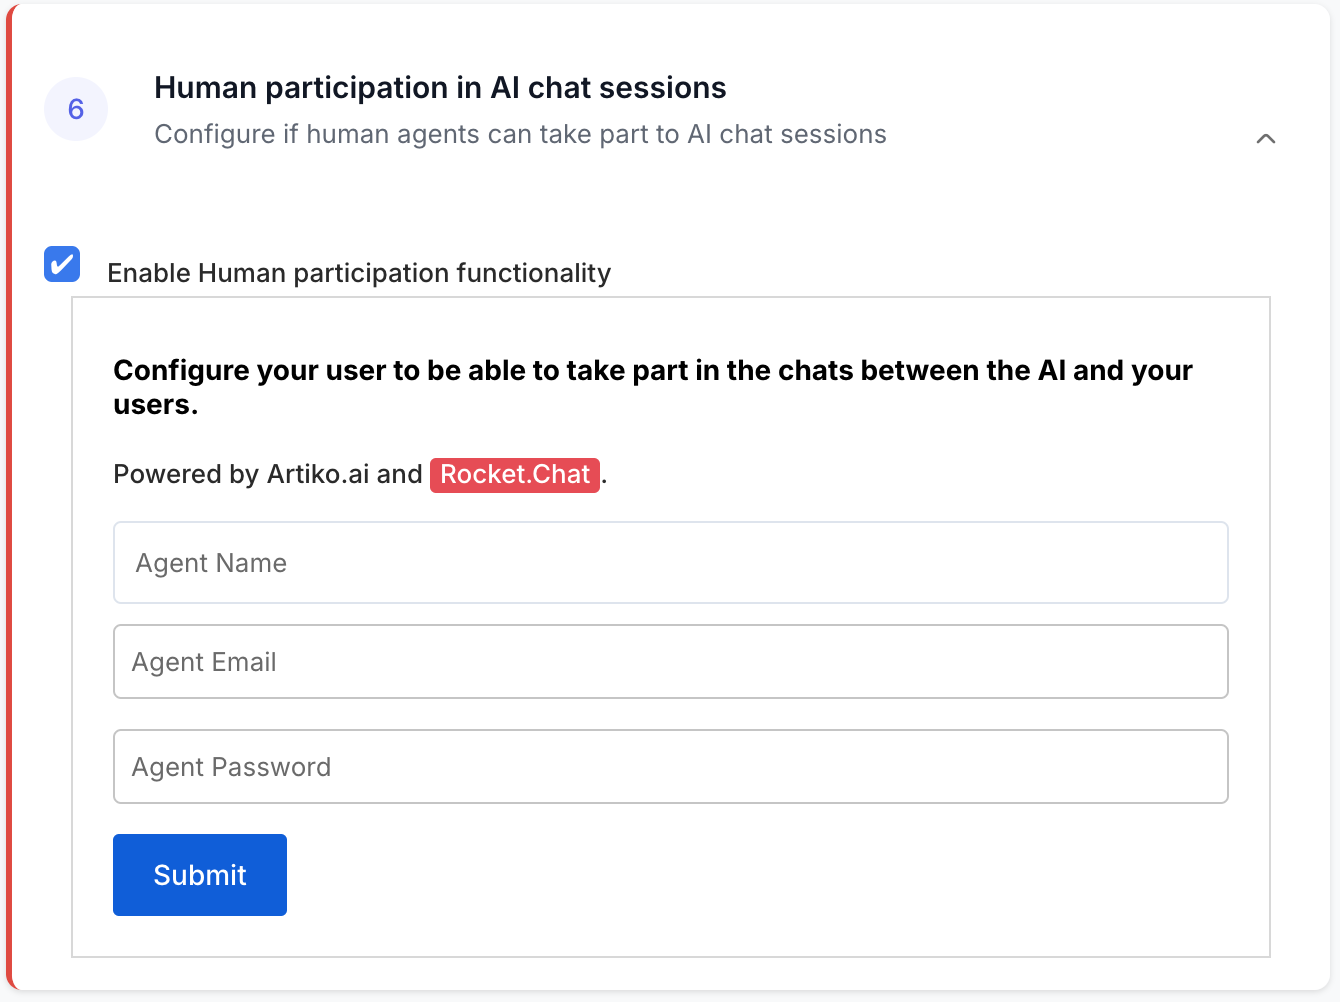
6. Human Participation in AI Chat Sessions
In this final step, you can decide whether to enable human agents to join AI-driven chat sessions. By activating this option, you integrate your chatbot with Rocket.Chat, allowing a real person to step in whenever advanced support or a personal touch is needed.
Enable Human Participation Functionality
Check this box to allow live agents to take over an AI conversation. Once selected, you’ll be prompted to enter:
- Name/Username: The name that will appear to users when a human agent joins the chat.
- Email: Can be different from your main Artiko account. This address will be used for agent login or notifications.
- Password: A password you choose for secure login to the Rocket.Chat platform.
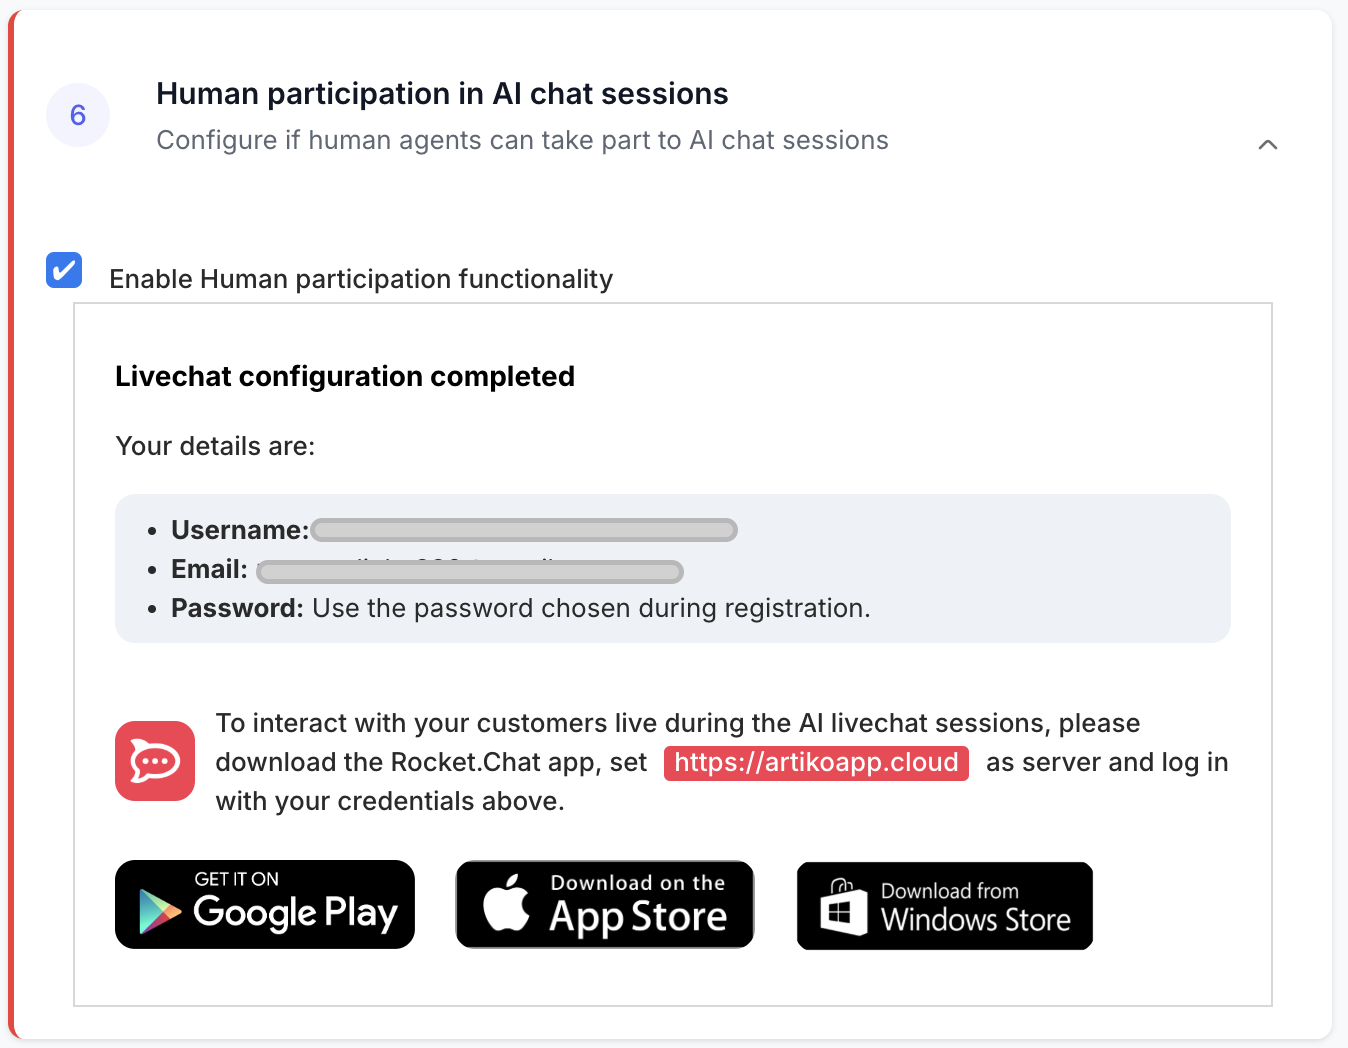
 Livechat Configuration Completed
After submitting these details, a confirmation box will display your new credentials:
- Username: The one you created above.
- Email: The one you entered during setup.
- Password: Use the password chosen during registration.
To interact with customers live during AI chat sessions, you can download the Rocket.Chat app from your preferred app store (Google Play, Apple App Store, or Windows Store). When prompted, set “https://artikoapp.cloud” as the server and log in using the credentials you just created.
Once you’re logged into Rocket.Chat, you’ll be able to see ongoing conversations, step in when needed, and provide real-time support to users who request human assistance.
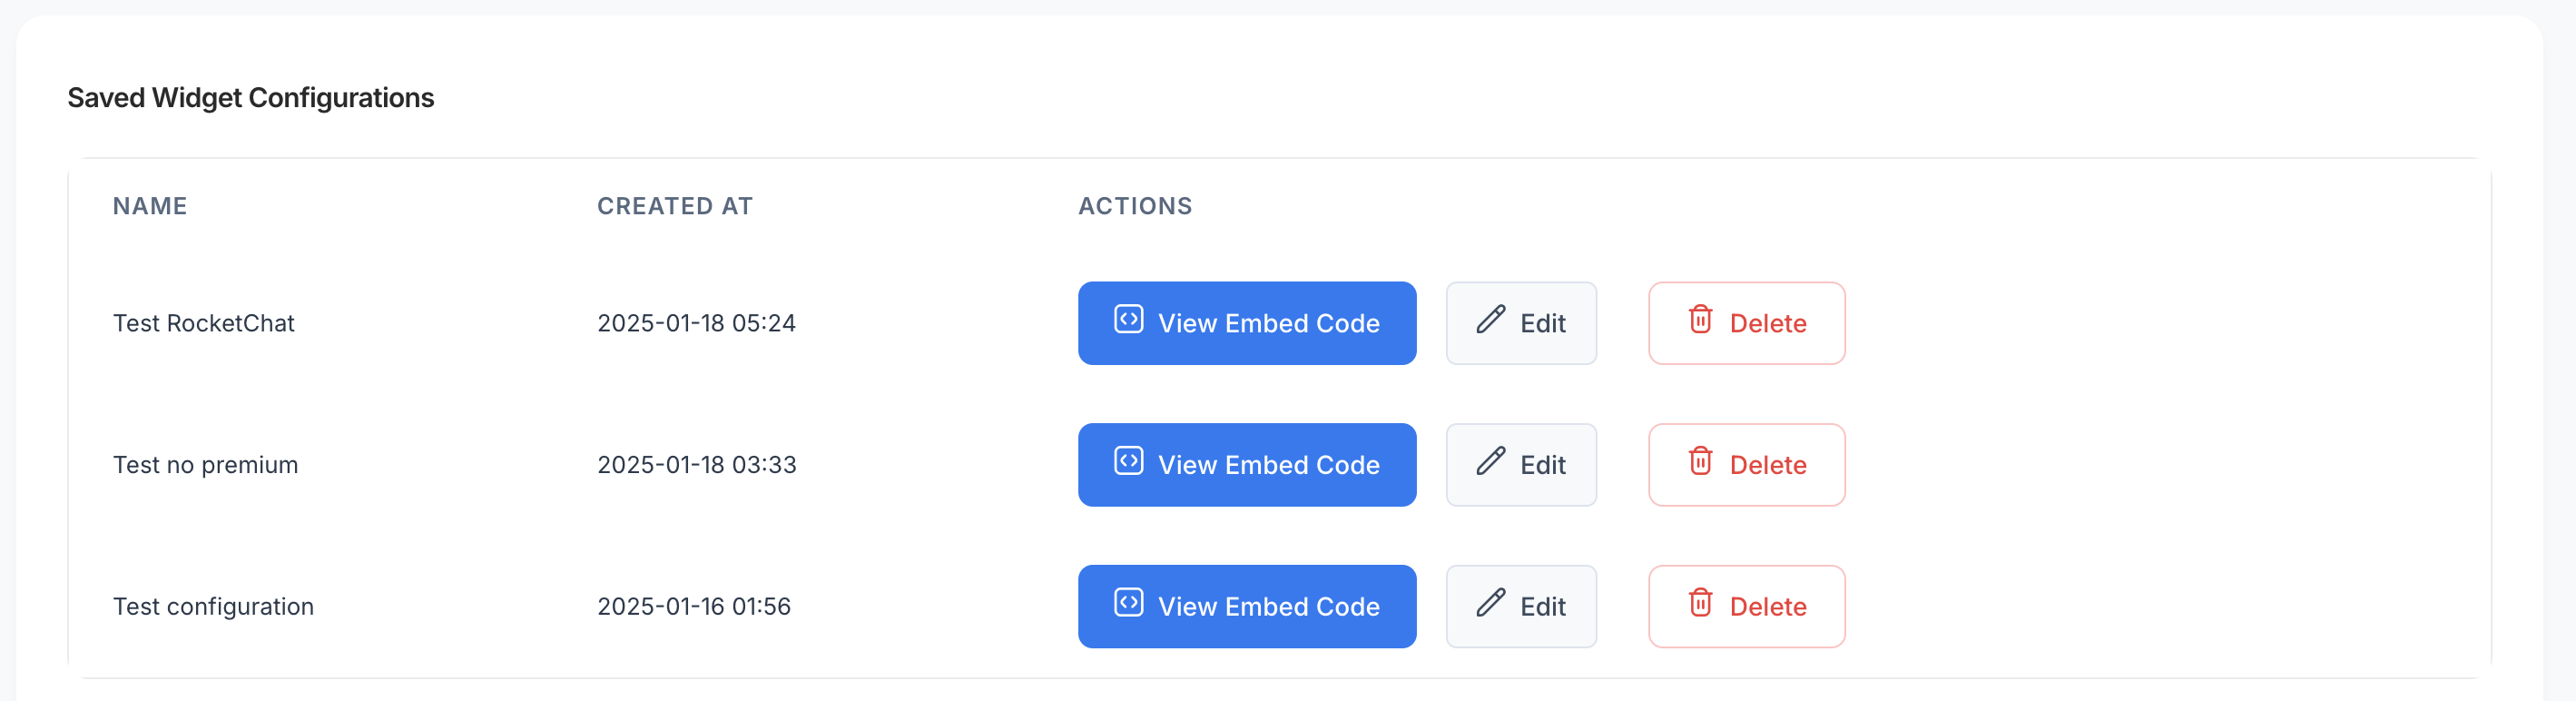
Saved Widget Configurations
In this section, you’ll find all the chat widget configurations you’ve created so far. Each entry displays the widget’s name and the date/time it was created. You also have three main actions:
- View Embed Code: Reveals the JavaScript snippet you can copy and paste into any web page to enable your chat widget.
- Edit: Lets you revisit the configurator to change the theme, text, or any other settings for that widget.
- Delete: Permanently removes the widget if you no longer need it. (This action cannot be undone.)
Important: API Credits Information
At the bottom of the list, you’ll see a panel showing your current API credit balance. Each AI-powered chat widget request uses a small portion of credits. When you run out of credits:
- Widgets will stop working: Your visitors may see an error or no response from the chatbot.
- Add Credits Now: Click this button to purchase or add more credits and ensure uninterrupted chatbot service.
Keep an eye on your balance and top up as necessary to maintain continuous chat functionality for your users.